Learning journal Week_7_NUKE

What I have done in this week:

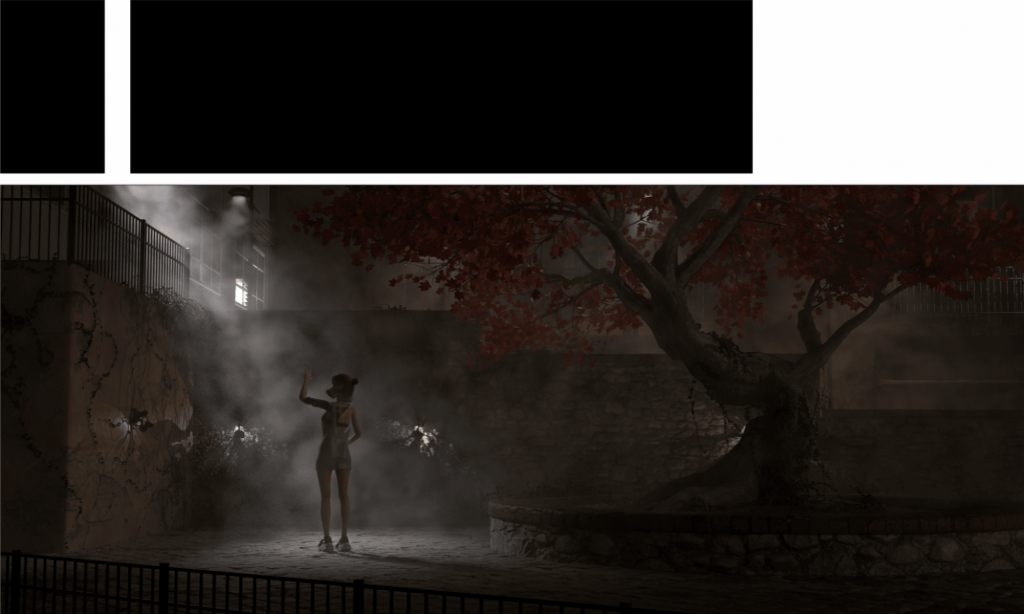
After last week’s study, I have a deeper understanding of the properties of colour and specific nodes of the Nuke. I am more sensitive to colour because I have some experience in photography. Both Photoshop and DaVinci are some of the colour posting software I use regularly. Fortunately, both DaVinci and Nuke are node-based operating software, so many functional nodes are similar. Such as the picture I finished this week show.

I prefer to let data flow between nodes than a hierarchical structure of software. Therefore, I enjoy the greater freedom to adjust parameters in Nuke. I also tried the node that I learned In last week like the picture below.

Especially for the nodes of unpremult and premult, I was never quite sure of the slight difference between these nodes before. By understanding the principles, I have a better understanding of the mechanism by which the RGB and Alpha channels operate within the software.

Learning journal Week_7

In week 7 I have tried to make a new human model based on the DAZ 3d. I chose the base model body from Daz3D and started to edit the head in the Zbrush. The first step is to add detail to the ears, eyes mouth, nose and so on. When increasing the object subdivide level, the head needs to be added appropriately detail. Then I used the XYZ human textures to paint different textures in Mari.

I have thought that my PC which contains more than 200G Ram is enough for a high subdivided level in the Zbrush, however when I import the displacement into the whole body in level 7 subdivide the Zbrush notices that my PC has insufficient Ram for processing even the RAM only used around 50G (25%). I have to separate the head and body to handle the problem and I must care about the problem multitexture between the sew parts of two objects. Some problems in the side of different UDIM testures like the blow picture show. There is a obviously edge to divide the model.

Throughing the Layer and morph target, I fixed the mainly problem. After I export the displacement, it also need to be mixed in Photoshop carefully and I get the result like the picture below.

For the animation part, both the building controner or skining the animation is not easy. After I know the principle and basecial step to make shape blend, I use the Advanced skeleton to make the joint and controners and paint the skin by the ngSkintool.

Learning journal Week_6

What I have done in this week:

Recently I joined short video teamwork for a certain one’s graduation product. After frequency communication, I have further understanding of how important the workflow or the standard work pipe is. Someone only transformed the .mb file to me however, when I tried to load the scene the system notice I lack some reference and colour manage files. In other respects, I found that not everyone knows about the whole workflow even don’t know what the next step needs to do. This is the problem that they can not export the appropriate format file for the next process.

For this week what I learned, the animation module of Maya has always been my weak point. Not only the skills of the Joints, Skins and Controller but also the principle of the animation. Some essential tiny animation of humans is hard to obvious but this small shake or front swing make the animation look vivid and realistic.

Learning journal Week_5_NUKE

What I have done this week:

In the week, I was happy to learn the skills of cinematic. Different perspectives of shots express the creator’s emotion and the director can enhance the subject’s confidence or weak from different angles. In addition, abundant shot selections make the creator has more choice to show different levels of detail about the subject. Besides the shot principle, the Light attributes also affect the cinema scene such as the brightness, hardness, or softness of the scene.

Then, I tried to compose a short video in Nuke as the picture showed. I made a simple random rotation motion in Houdini and render a sequence with z alpha. In Nuke, I used the Zdefocus node to show the z-axis in another dimension. After that, I tried to use the Colorcorrect node to match the background picture. Finally, I added some tiny motionblur to make the view more realistic.

After finishing all adjust, I used the merge node to combine the two groups and expert a video by the write node.

Learning journal Week_4

What I have done this week:

I have finished a complex wood model called Paiwei, which is for commemorates the dead of my grandfather. I begin with an alpha texture in the Zbrush and as I predicted, the processing is really challengeable and funny.

In the beginning, I planned to sculpture tiny detail in a whole simple cube however, the result is not good. Because it looks heavy such as the below picture.

So I changed the old method, I divide the polygon into three-layer. By adjusting the position and scale to make some holes that make the model look more hollow.

Then I use the polymesh to reduce the number of the polygon. Once limit the face number less than 40,000, I export the low-level model to Maya and prepare to finish the UV map. I want to bake the complex detail into a low-level model so the UV is necessary. When these steps are all done, the rendering picture such as below in Maya.

Finally, I use the substance painter and Photoshop to paint the texture. Because the UV map is auto-created by Maya, it is easier to directly paint in the 3d Model.

Learning journal Week_3

What I have done this week:

We finished bread models during the Week 3 lesson. Mr. Nick Savy focused on explaining how important UV and materials are. We started to create an effective UV map with the new unfold3D algorithm. All processes look good, however, my Maya always has errors for unfolding which show as “Error: Unfold3D process error“. In the beginning, I thought maybe some unsew lines cause the error, I tried to unfold some simple models and get the same error result. Then, I tried to restart the Maya because I guess that there is a certain bug to make the unfold tool problem. Unfortunately, the error still exists. So, I continually tried to update the Maya 2020 to the newest version 2020.4, the bug is still not repaired. Finally, I find a solution in the Autodesk question platform.

Because the PC in LCC is intel 8700k, it’s fine for the Maya. but the AMD 3rd chip can not support the unfold3D algorithm well. So, I guess the unfold3d can not use the hyperthreading correctly of Zen 2 architecture, especially the thread more than 32. So I tried to limit the thread when the unfold3D algorithm worked. After adding a system environment variable, the bug is ultimately fixed.

Because simple models are not challenging for me, I find a complex model which contains beautiful patterns and multiply level structures to build. Maybe next week I can finish the exquisite wood product and post pictures. Due to the tiny details, I plan to use Zbrush to solve the micro-detail. Then baking the displacement texture to the low-level subdivision and finished other textures in Photoshop and substance painter. I believe I will enjoy the processing of the whole workflow.

Learning journal Week_2

what I have done in this week:

In the second week, we learned some new amazing content about Maya and Matching Movies. I knew how essential the topological of models are according to the demonstration. For the Matching Movies skills, Mr. Dom talked about further features of 3D Equalizer to match point to the surface of models and combine rendering results in Nuke.

In the processing of 3d tracking, I was trying to make the average value of the deviation below 0.23, however, the 3d model has a tiny unpredictable shake. I guessed maybe there is some bad point causing the problem. The result of the animation is overall pretty good.

The magnificent palace is my first choice to build for my ultimate product. Unfortunately, my grandfather who bring me up passed away on 14th October. So, I want to build a traditional scene to make up for my absence at his funeral. I have found a reference picture such as below. It is a challenge both for the skills and my psychology.

image from https://www.artstation.com/artwork/YEYWq

Learning journal Week_1

I was extremely excited to learn the fantastic film skills with my classmates. I awarded that the processing of learning Visual effects is a challenge for me who studied computer before. In the VFX fundamentals lecture, Mr Nick Savy show the whole workflow of Maya including Modeling, Texturing, Rendering and so on. I started to know more about how does the software work in the standard pipeline. Then Mr Dom Maidlow who worked for the CG company, Union VFX, helped us knowing the matching movie further. In addition, he talked about many interesting stories in the Union VFX and different careers in VFX. The job of Effects technical director(FX TD) was impressive because being an advanced FX TD is my dream for my personal career and this is also the reason why I chose to study computer technology for my bachelor. According to the presentation of Mr Dom Maidlow, the FX TD role need to involve a mix of art and technological competencies. Furthermore, both technical skills and an appreciation for existing animation and effects need to be developed. Another essential factor is the knowledge of scripting languages such as Python and C++. In a word, it’s more clear for me what should I learn in the future and I will try my best to finish a satisfactory product.