This week we learned some new things about 3d Tracker which is similar to the 3D equalizer.
The main workflow and principle are the same with other tacker software, however when I want to re-distort the image the side of the image will have some errors such as the below image.
this week We have learned about constraint and animation. Because keying frame is a little complex, I just create a circle as a controller and using script to links each element together . If I want to change speed at any frames I can only changing one parameter to control all things. Then I used some noise function to control the speed of wheels.
We also learned something about mash. I am also interested in the workflow of the mash UI, however I hardly ever used the mash part in maya, so I will cost more time to know more about these.
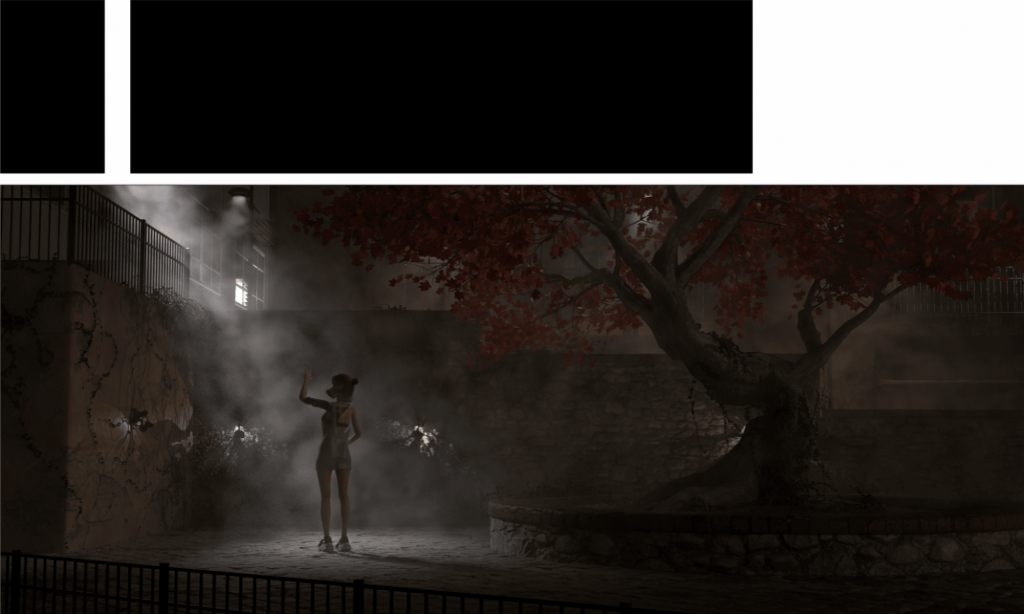
This week we found students to work with through face-to-face meetings. In the meantime we decided we wanted to make a short action film together. It is a mythical story in the Chinese style.
https://www.bilibili.com/video/BV1YV41117ke
Story Background:
The martial god Ivy alone guards the artifact of his former comrade-in-arms (lover) by the sacred tree of the altar.
The cool water of the divine pool suppressed the soul of the spear, and the comrades-in-arms died in front of them and turned into this wisp of soul into their own artifacts, desperately trying to protect their own lovers. Even after many years of death, this wisp of soul does not forget the infinite intention of fighting and killing.
Ivy Looked at the restless spirits in the pool, full of sentimentality, and paced into the formation. The spear seemed to sense the call of its lover and began to emit a piercing beep. Yu Shi was touched by the love of his comrades-in-arms and decided to accompany the spear to dance for a while. With his right hand outstretched, the spear flew in.
( Dancing with spears)
Dancing with a spear, the memory brings himself back to the original scene
Scene 1: On the war zone, the fledgling himself cowardly hiding in the corner, do not dare to resist the enemy, an enemy soldier stared at the Ivy, saw that she had no power to fight back, hit Ivy to the ground, just at the moment of the last blow, the back of the comrade flashed to block the last blow…
Scenario 2:(Happy Memories).
Scene 3:When Ivy can stand alone, the two are in a trouble, and the comrades in arms block in front of Ivy to protect her, and finally she survives alone.
The spear dances to the end and gradually ends.
The spirit gradually quiets down with the passage of time, and the Ivy also remembers the deceased in the dance of the spears. In this altar, guarding a pure land behind him, from war.
Narrative Rhythm Outline:
P1/0~10s:
Empty shots illustrate the scene, and the shots drift with the leaves and land on the spear.
P2/11s~26s:
A close-up of the artifact spear, showing the trembling of imprisoned souls:
This week we almost finished all the methods to remove markers. I will collect all methods by my own understanding and I won’t post some simple way that does not get a great result.
The first method I want to call the High and low-frequency method because this way of the principle is very similar to the PS. The way separate images into two parts by dividing node. One of them records the low-frequency information without detail only having colours and another one has high-frequency detail. Then only changing the high-frequency detail and combining them, we can get a nice result. There is a more advanced skill for fixing the high-frequency detail. I can transfer the original images a little to get similar detail instead of roto paint.
The second way is Roto paint which uses a patch directly to cover the marker. We have an advanced method to track each pixel, smart vector node. The node is different from the track node. the smart vector can analyze each pixel vector information in different channels for each frame. Then the VectorDistort node will transfer raw data of the vector to use by other nodes.
The third way is to fill pixels by unpremult node.
Except the third method is a little different principle from others, the main aim of methods is to cover the marker by other pixels in a specific frame, then track the position to cover the marker in the whole sequence. We use a different way to improve each workflow for saving time and reduce work pressure to avoid painting each frame.
Homework link
This sequence is not easy to track even I tried my best to adjust the colour to extract more contrast. Such as the picture below, the left line I want to divide the picture into two parts and one of the parts will keep colour, another one keep other information. Then I use rotopaint node to cover the marker shape and copy the marker transform position to the rotopaint node. However, the result is not perfect, because the specific marker in cheekbones has obviously changed of shadow and shape deformation. I combine another method to solve certain frames and mix them in end.
For the other 5 markers, I found that if I adjust all tracker positions and each error in different frames, will cost too much time. So I directly use a simple workflow to remove all markers like below. Although there are some node is different with what I learned in class, the principle is the same. I use rotoPaint3 to cover other markers frame by frame.
For adding a texture to the sequence, I directly use a texture and copy tracking information to it, then it works which can attach the face to move.
For the machine example of Mr Nick Savy, I noticed that he added a key to the model UV offset to “cheat” eyes. However, in this way, a UV map is required to unfold to a specific type otherwise, we will get a wired result. Besides, he made a blender shape for the belt and the tiny shaking will make the belt look like working normally.
For myself, I really like to make a steam machine such as the reference images.
Based on the old machine, I will add a belt to it. Now I almost finished half of the model. Such as below:
The steam will push the stick to support power for the wheel. Then I want to add another wheel to change the kinetic energy direction.
The first step for the raw sequence is to denoise for a better result of the track. The reason exports the file and reads again is to reduce the stress of the CPU to save more resources for other important steps.
This Part is for remove light by the roto paint node. Because I don’t export Alpha channel in the RotoPaint1 so I recreate The Roto1 node to draw a alpha shape covering the old one. Then I blur the edge a little and premult RGB with alpha. Finally hold the Frame to keep the image same.
Catching the patch to the footage correctly, I transfer the three point tracker information to the new image which is frameholded.
Once I merge the raw sequence and the patch, I almost get good result. However, the tiny grains is not correct. To see the problem obviously, I need extract the tiny noise. The input sequence is divided into two ways to extract noise and enhanced them. Secondly, select higher value color, which shoule be the noise, to merge. In this process, adding grades and colorcorrect node is helpful for enhance the noise. Then puls the extracted noise to the raw sequence and I can get a specific result to check the tiny grain.
The next stage is removing markers. The princlple is same to solve the different shadow. I want keep the skin detial excpet the color so use divide node to seperate the image which mathmatic should like A/B. Then, I multiply the raw image to merge12 which mathmatic shoule be A/B*B =A. So I get the raw detail and new color on it. However the result is not perfect, I need to change the scale of transform node, the size of blur node, grain node and colorcorrect.
In this group project, my main responsibility is for modelling a seahorse. The seahorse model maintains biological skin so I start it at Zbrush.
Then the similar workflow with the human model building. The model in Zbrush cannot be directly used without UV and it has an extra high polygon. So I made a low polygon model with UV to make it as a base. After inputting the low polygon one and high polygon model into the same subtool I can bake the micro-detail into displacement texture.
Then I export the low polygon model into Mari to paint the skin texture.
To show the different reflections in the subsurface I mix different procedural noise 2D textures.
Then, my classmate Louis told me, we also need some simple animation. I continue to make a skeleton and rig them. Additionally, I build some simple controllers and hide some useless parameters.
This week I started to build the eyes and fur. I build a simple hair shape by low polygon models to check the outline of the head. The, building the amazing eyes which was divide to three parts.
I have already finished some human before, so the workflow is clear for me. After put some lights in the scene, the result such as below:
Compared to before model, I add the micro fur for the face. Maybe it’s hard to recognize, it is actually effect the final result.
During the week I experimented with Nuke’s roto node, roto paint node and tracker node And try to pass the information from the tracker node to the roto mask, so that the roto mask can follow the object’s movement.
Through this week I have learnt the importance of masking in the film industry. A lot of elements in the pre-production work need to be fixed in advance to get a good result.